Turf Installation Flaws - published guidance, explained without the sales pitch.
The Ultimate Groundwork Guide: Laying Artificial Turf Step-by-Step
This comprehensive, step-by-step guide walks you through the entire process of installing a professional-grade artificial lawn directly on soil. Follow these twelve essential steps to ensure your synthetic turf remains flat, drains perfectly, and looks lush and natural for years to come.
---
Step 1: Plan and Measure Precisely
Before lifting a shovel, the ultimate success of your artificial grass installation hinges entirely on meticulous planning and precise measurements. Begin by sketching out your lawn on paper, identifying any curves, obstacles, flowerbeds, patios, or irregular angles that will affect the layout. Artificial turf typically comes in standard rolls of two or four meters in width, so you must plan your rolls strategically to minimize seams and keep waste to an absolute minimum. Measure the widest and longest points of your yard, adding a 100mm to 150mm buffer to each edge to ensure you do not run short during the fitting phase. Think carefully about where seams will fall; keeping them away from high-traffic zones or direct viewing angles from the house will help make them virtually invisible once complete. Furthermore, inspect the drainage patterns of your existing lawn. Since artificial grass relies on a porous backing to drain water, understanding how water flows across your soil is essential. Don't forget to check for underground utilities, sprinkler lines, or cables before starting to dig. Taking the time to double-check your measurements now prevents costly ordering mistakes and layout headaches later, saving you time, money, and stress. Additionally, consulting the manufacturer's turf guidelines regarding pile direction and backing material properties can help you optimize your layout and choose the perfect tools for the job.
---
Step 2: Excavate and Clear the Site
Once your layout is mapped, it is time to prepare the canvas by excavating and clearing the site. Excavation is critical because you must make room for the sub-base and laying course that will support your artificial grass. Use a turf cutter or a spade to remove the existing lawn, weeds, roots, and topsoil to a consistent depth of 50 to 75 millimeters (about two to three inches). This depth ensures your finished artificial grass sits perfectly flush with your surrounding borders, patios, or pathways once installed. Be extremely thorough during this phase—remove any large roots, stubborn stones, and organic material that could rot and cause the ground to sink or become uneven over time. Keep an eye out for shallow sprinkler pipes or electrical cables as you excavate the soil. Once the turf is removed, dispose of the soil and green waste responsibly, perhaps renting a skip if you have a larger garden. Clearing a clean, uniform area is physically demanding work, but a flat, debris-free excavation is the only way to guarantee your synthetic lawn remains completely flat, stable, and visually perfect for years to come. Removing this topsoil layer also eliminates most of the weed seeds and dormant insects living in the upper soil profile, giving your new grass a clean, sanitary base.
---
Step 3: Grade and Compact the Surface
With the soil excavated, the next crucial phase is grading and compacting the bare ground. A common mistake is assuming the sub-base will naturally fix any bumps in the dirt; in reality, sub-base material will eventually settle into whatever shape lies beneath it. Begin by grading the soil, which involves using a rake to smooth out high spots, fill in low depressions, and remove any lingering clods of earth. Ensure there is a very gentle, natural slope away from your home or patio to facilitate proper water runoff and prevent pooling against walls. Once the surface is smooth and graded, you must compact the soil. Dampen the earth slightly with a garden hose to help the soil particles bind together, then run a heavy vibrating plate compactor over the entire area. For small, hard-to-reach corners or edges, use a manual hand tamper. Go over the soil at least twice, crossing in perpendicular patterns, until the ground feels rock-solid underfoot. This step creates a stable foundation that prevents the sub-base from shifting, sinking, or rutting over time, protecting your lawn from unsightly dips. Taking the extra time to properly level and compact this base clay or dirt layer now pays major dividends later, ensuring your finished synthetic lawn maintains a perfectly level and professional appearance.
---
Step 4: Install Edging (Optional)
Installing perimeter edging is highly recommended, as it acts as a structural frame for your artificial lawn. Without a solid edge, the sub-base materials and the turf itself can migrate over time, leading to frayed edges and shifting grass. You have several excellent edging options depending on your design preferences and budget: flexible plastic or steel edging is perfect for curved borders, treated timber benders work well for straight lines, and concrete haunching provides a permanent, heavy-duty solution. Secure your chosen edging firmly around the entire perimeter of the lawn. If using timber, drive wooden stakes deep into the ground and screw the edging boards to them, ensuring they sit slightly below the level of any surrounding paving. The top of the edging should align perfectly with where you want the base of your grass fibers to meet. This creates a neat, clean border, prevents soil erosion from neighboring garden beds, and provides a solid anchor point for securing the turf later, holding the entire installation tightly in place against heavy foot traffic and changing weather. Having a robust perimeter also prevents pets from digging up the edges of your new lawn, extending its lifespan.
---
Step 5: Lay Weed Membrane
With your borders secured, the next essential step is to lay a high-quality weed membrane. Although artificial grass does not support plant growth on its own, airborne seeds can find their way into the backing, and persistent weeds can push through the soil and drainage holes from below. Unroll a heavy-duty geotextile weed barrier over the compacted soil. This layer serves two crucial purposes: it blocks weed growth from below and acts as a separation barrier, preventing your aggregate sub-base from sinking and mixing into the underlying clay or dirt. Lay the sheets of membrane across the entire area, overlapping any seams by at least 100 to 150 millimeters to prevent weeds from finding gaps. Secure the overlaps and edges with galvanized landscaping pegs or plastic pins to keep the fabric flat and prevent it from shifting when you spread the heavy stone. Taking a few minutes to install this durable barrier prevents future weeding maintenance, keeping your new lawn pristine and low-maintenance. A high-quality geotextile weed membrane is especially important in areas prone to aggressive weeds like dandelions or nettles. Water can easily pass through the membrane's microscopic pores into the subsoil below, preventing any waterlogging issues on your synthetic grass. Furthermore, the material is extremely resilient and won't decay or degrade in the damp earth, serving as a permanent shield that separates the layers and maintains the integrity of your lawn's topography.
---
Step 6: Build & Compact the Sub-base
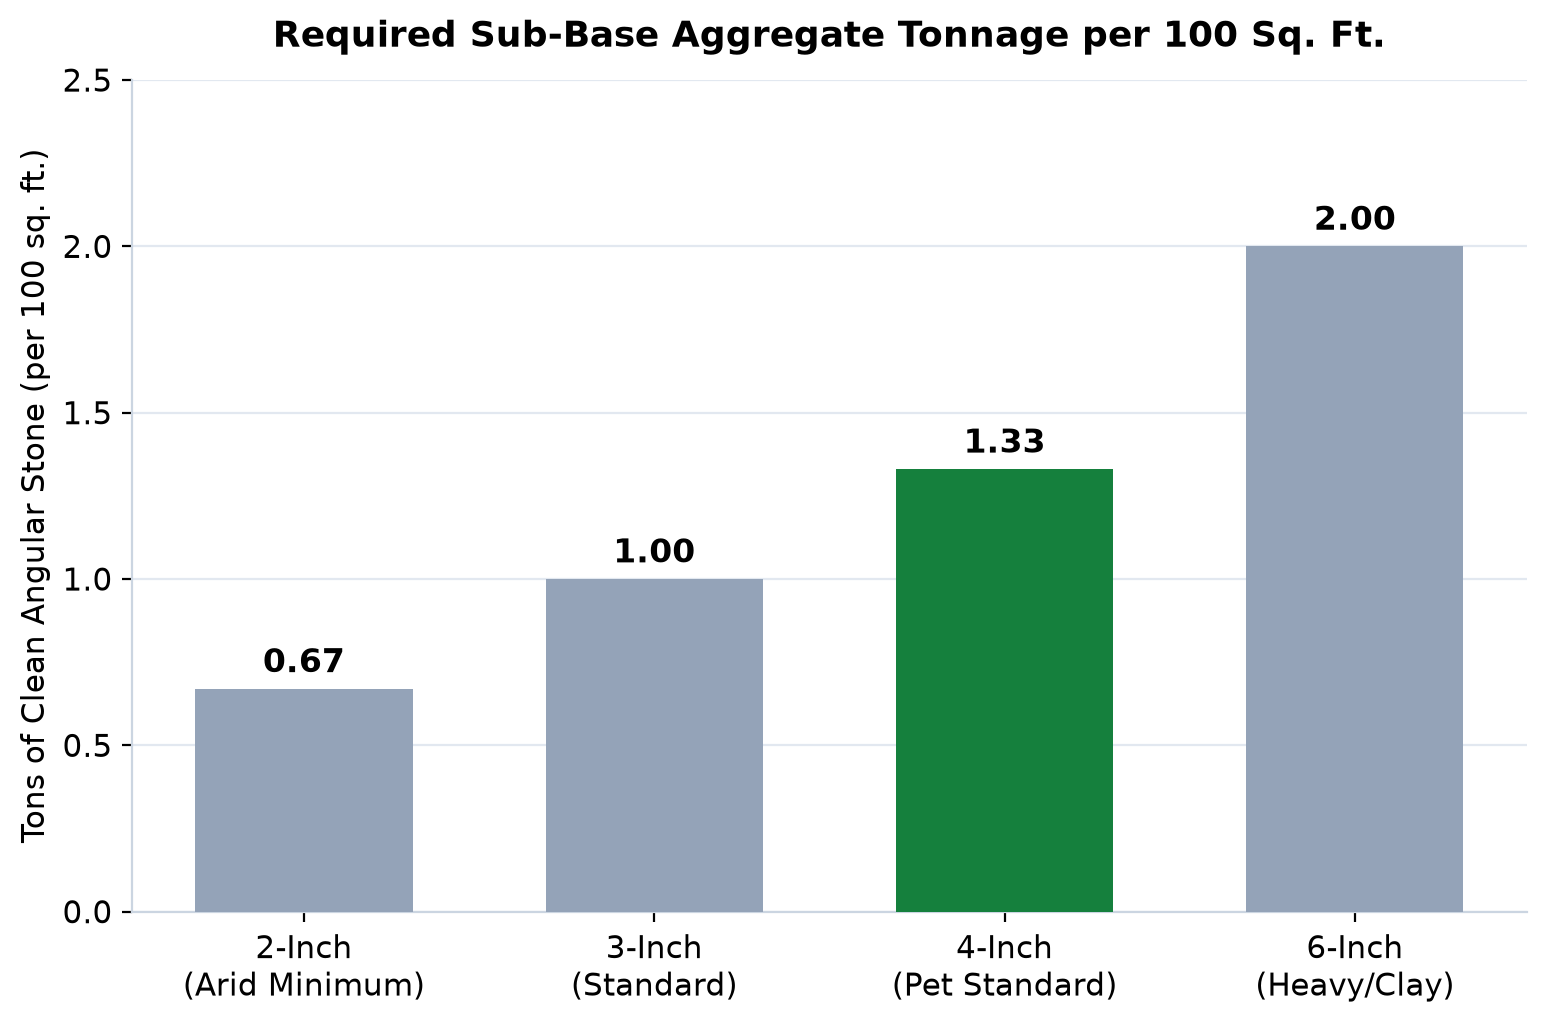
The sub-base is the true backbone of your artificial lawn, providing structural stability and essential drainage. Spread an aggregate material, typically MOT Type 1, limestone crusher run, or granite crusher run, across the weed membrane to a depth of 50 to 75 millimeters. This stone aggregate creates a porous, load-bearing layer that can support heavy foot traffic, playful pets, and heavy patio furniture without shifting or denting. Use a rake to distribute the aggregate evenly, ensuring it maintains the grade and slope established earlier. To achieve maximum compaction, spray the stone lightly with water to lubricate the dust and stone particles, allowing them to lock together tightly. Pass a heavy vibrating plate compactor over the aggregate at least three to four times, moving in perpendicular directions. The sub-base is properly compacted when it is completely flat, solid, and does not show any footprints when walked on. A well-built sub-base ensures your lawn will drain efficiently, even during heavy rain, and remain stable for over a decade. If you skip this critical compaction process or use the wrong aggregate materials, your artificial lawn will soon develop dips, soft spots, and puddles after heavy rainfall. Spreading the stone in thin, manageable layers of about 25 to 30 millimeters and compacting each layer individually before adding the next will guarantee the tightest lock and the most solid, stable foundation possible.
---
Step 7: Level with Granite Dust or Sharp Sand
To create a perfectly smooth, comfortable surface to walk on, you must apply a final laying course over your compacted sub-base. Spread a 20 to 25-millimeter layer of either granite dust (often called grano) or sharp sand. Granite dust is highly recommended over sharp sand because it compacts into a more durable, stable surface while offering superior water drainage. Sharp sand can shift slightly under heavy use or intense rain, whereas compacted granite dust remains rock-solid. Use a rake to spread the material evenly, then use a screeding bar or a long, straight timber board to slide across the surface, leveling it completely. Lightly dampen the laying course with water and compact it once more using the plate compactor or a hand roller to create a flawless, ultra-smooth foundation. Take your time during this step; any tiny bumps, ridges, or dips left in this final sand or dust layer will be visible on the surface of your grass once it is rolled out. When smoothing the course, pull the straight board toward you slowly, keeping it flat against the edging borders to achieve a consistent height. Once you are finished screeding and compacting, test the density by pushing your thumb into the surface. It should feel firm like a hard-packed dirt road rather than soft sand, ensuring that it can withstand the impact of regular foot traffic and garden activities without leaving permanent depressions or footprints under the grass backing.
---
Step 8: Roll Out and Acclimate the Turf
Now comes the exciting moment of rolling out your artificial grass. Carefully unroll the turf over your prepared laying course, taking care not to drag it, which could disturb the perfectly flat sand or granite dust base. If your lawn requires multiple rolls, make sure they are all laid in the same direction. Look at the grass fibers; they naturally lean slightly in one direction. For the best aesthetic results, the pile should lean toward the main viewing angle, usually looking toward the house or patio, as this makes the grass look fuller, more natural, and less shiny. Once the rolls are positioned, leave the grass to acclimate in the sun. This acclimation period, which should last at least 2 to 24 hours, is absolutely crucial. It allows the heavy backing material to warm up, relax, and flatten out, removing any creases or curls from being tightly rolled up. Letting the grass acclimate ensures a smooth, bubble-free installation that lies perfectly flat against the ground. During this waiting period, the heat from the sun makes the rubber or latex backing of the grass much more pliable, allowing the turf to naturally contour to the laying course underneath. While the turf is acclimating, try to avoid walking on it excessively to prevent shifting the heavy rolls. If you spot any stubborn wrinkles or persistent packaging creases, you can gently stretch the turf outward from the center before securing the edges to achieve a smooth finish.
---
Step 9: Join and Secure the Turf
If your project requires more than one roll of artificial turf, joining them together seamlessly is vital for a professional finish. Start by folding back the edges of the adjacent rolls. Trim back three or four tufts from the edge of each roll to expose a clean, flat backing material free of loose fibers. Lay the rolls back down and align them, leaving a consistent gap of about 1 to 2 millimeters between the pieces; if they are too close, they will peak, and if they are too far, the seam will be highly visible. Once aligned, fold the edges back again and lay a specialized jointing tape along the seam, green side down. Apply a high-quality outdoor polyurethane turf adhesive in a zig-zag pattern along the tape, or use self-adhesive tape. Carefully fold the grass edges back down onto the glue, ensuring no grass blades get trapped in the adhesive. Walk along the seam or roll it with a weighted roller to press it firmly into the glue, creating a strong, permanent bond. For the best result, ensure the glue is applied in dry weather, as excessive moisture can weaken the chemical bond before it is fully cured.
---
Step 10: Trim & Secure the Edges
With the main surface of your grass laid and any joins completed, it is time to fit the perimeter to your edging. Use a sharp utility knife to trim the excess turf along the borders. Always cut from the underside (the backing) of the grass, sliding the blade between the tuft rows to avoid slicing through the grass blades themselves, which would leave a sparse, artificial-looking edge. Change your knife blades frequently, as the tough backing will dull them quickly. Once the turf is trimmed to fit snugly against your borders, secure it firmly in place. If you installed a timber edging, you can use rust-resistant galvanized deck screws or landscaping nails to attach the turf backing directly to the timber every 100 to 150 millimeters. If you chose a concrete or stone border, apply a heavy bead of outdoor turf adhesive to glue the edge down, or use galvanized U-pins hammered directly into the ground. This keeps the edges secure and prevents tripping hazards. When trimming around curves, make multiple small, curved cuts rather than one single continuous stroke, as this prevents accidental over-cutting. Tuck the cut edges neatly between the border and the base material using a blunt putty knife to create a seamless, professional roll-over edge that hides the backing and gives the illusion that your grass is naturally growing directly out of the adjacent pathways or garden beds.
---
Step 11: Brush Up & Add Infill
To give your artificial grass a natural, lush appearance and long-term durability, you must apply a sand infill. Infill serves several critical functions: it provides weight (ballast) to keep the turf flat and prevent wrinkling, protects the backing from harmful UV rays, and supports the individual grass fibers so they stay standing upright rather than flattening under foot traffic. Use a drop spreader or shovel to distribute kiln-dried silica sand evenly across the lawn at the manufacturer's recommended rate (typically 4 to 8 kilograms per square meter). Once the sand is spread, use a stiff-bristled broom or a specialized power brush to sweep the lawn vigorously against the pile. This brushing action pushes the sand grains down to the base of the grass fibers, where they settle onto the backing and force the grass blades to stand tall and straight, giving your lawn a beautiful, full look that resembles healthy, natural grass. Selecting the correct infill material is vital; kiln-dried silica sand is the industry standard because it has round, smooth granules that will not degrade or cut the synthetic grass fibers over time. As you sweep, work in sections and always brush against the natural lean of the pile to ensure the sand falls evenly between the blades, locking the entire lawn together and preventing the turf from creeping, expanding, or contracting as temperatures fluctuate throughout the seasons.
---
Step 12: Let it Settle
The final step in the installation process is simply letting your new artificial lawn settle. After the infill has been brushed in, the sand needs a bit of time to settle deep into the grass fibers and consolidate, and the backing needs to fully adjust to its new environment. Avoid heavy use, active play, or placing heavy garden furniture on the grass for the first 24 to 48 hours to allow everything to settle properly. During this time, walk the lawn to inspect the edges and seams, making sure there are no loose pins, exposed adhesive, or uneven patches of sand. If you notice any areas where the sand looks thin, apply a small touch-up and brush it in. Once this brief settling period is over, your artificial grass is fully locked in, stable, and ready to enjoy. You are left with a stunning, low-maintenance green lawn that will look perfect in all seasons for years to come. Additionally, this settling phase gives you a perfect opportunity to brush the lawn one more time to distribute any remaining surface sand. Keep a close eye on the lawn over the first couple of rainfall cycles; rain will naturally help wash the sand deeper into the thatch layer. If any sand shifts or looks uneven after a heavy storm, simply use a soft broom to gently redistribute it, ensuring your lawn maintains its flawless look for years.